Procedure for repair of a mid-span failure in pixels
This article details how to repair pixels (nodes, modules, strip, bulbs) when that length of lights has a mid-span failure. This process does not apply to pixels with one or two failures of a single color (red, green, blue). Here would be examples of such a failure:
Before you start - make absolutely sure this is an actual pixel failure. Here are common reasons for assuming a pixel string is bad:
Q: I needed 50 pixels in my string but now I have 48 - what do I do?
A: If you need the exact number of pixels that were originally in the string, that can be accomplished in two ways:
A: No, pixels do not have any specific address, they get their address based on the location in the string. See this article for more information on pixel addressing.
Q: Can I do this same process for pixel strip?
A: Yes, see the video below for how to splice pixel strip.
Using solder and 1/8" shrink tubing:
Using solder shrink tubes:
Pixel strip repair / splice using 1/2" shrink wrap and RTV silicone:
- Controller Output > 30 WORKING pixels > 20 COMPLETELY NON-WORKING pixels
- Controller Output > 30 WORKING pixels > 1 COMPLETELY NON-WORKING pixel > 19 WORKING pixels
Before you start - make absolutely sure this is an actual pixel failure. Here are common reasons for assuming a pixel string is bad:
- Testing pixels with a sequence application (an external source of pixel control) - we recommend ONLY using the built-in test mode on your controller to test pixels. This will ensure that any possible mis-configuration in the sequencing software is no affecting the testing.
- AlphaPix Hardware Test Mode Video: https://youtu.be/xZ1Lu8z8MZM
- EasyPix Hardware Test Mode Video: https://youtu.be/IU8eb4LcIVg?t=3m50s
- Pixel string is hooked up backwards. All pixels have a direction and typically this is an arrow and that arrow should point AWAY from the controller's output
- Controller Output > 30 WORKING pixels > 20 NON-WORKING pixels
- Cut between pixels 29 and 30 and again and cut between pixels 31 and 32
- Re-connect / solder the original pixel count of 29 to 32 - make sure to maintain the same direction (don't reverse the string direction)
- Re-test output
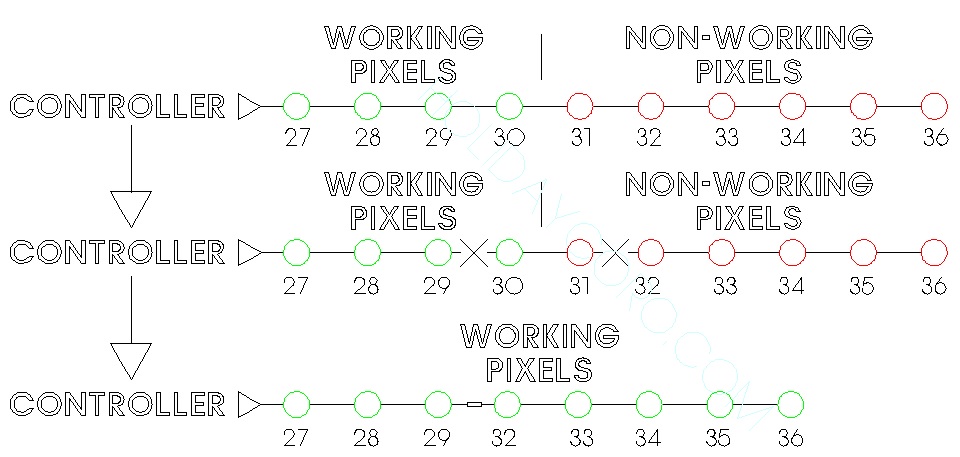
- Controller Output > 30 WORKING pixels > 1 NON-WORKING pixel > 19 WORKING pixels
- Cut between pixels 29 and 30 and again and cut between pixels 31 and 32
- Re-connect / solder the original pixel count of 29 to 32 - make sure to maintain the same direction (don't reverse the string direction)
- Re-test output
- Here is a diagram that shows the above process:
Q: I needed 50 pixels in my string but now I have 48 - what do I do?
A: If you need the exact number of pixels that were originally in the string, that can be accomplished in two ways:
- If there is not a plug at the end of the string or you are not using the plug at the end of the string, solder on any additional pixels to the end of the string (two in the example above)
- If there is a plug at the end of the string and the removed pixels (two in the example above) need to be replaced, that can be done anywhere on the string - just cut between two pixels and add in the pixels.
A: No, pixels do not have any specific address, they get their address based on the location in the string. See this article for more information on pixel addressing.
Q: Can I do this same process for pixel strip?
A: Yes, see the video below for how to splice pixel strip.
Using solder and 1/8" shrink tubing:
Using solder shrink tubes:
Pixel strip repair / splice using 1/2" shrink wrap and RTV silicone: